As always, with the Path of Exile 3.25 update, new changes to maps are about to change our farming strategies in the new league. Therefore, it is necessary to know which maps are the best to favorite and scry and will greatly increase your income of currency, Div Cards, and other important equipment. Our PoE 3.25 Best Map Tier List will help you identify!
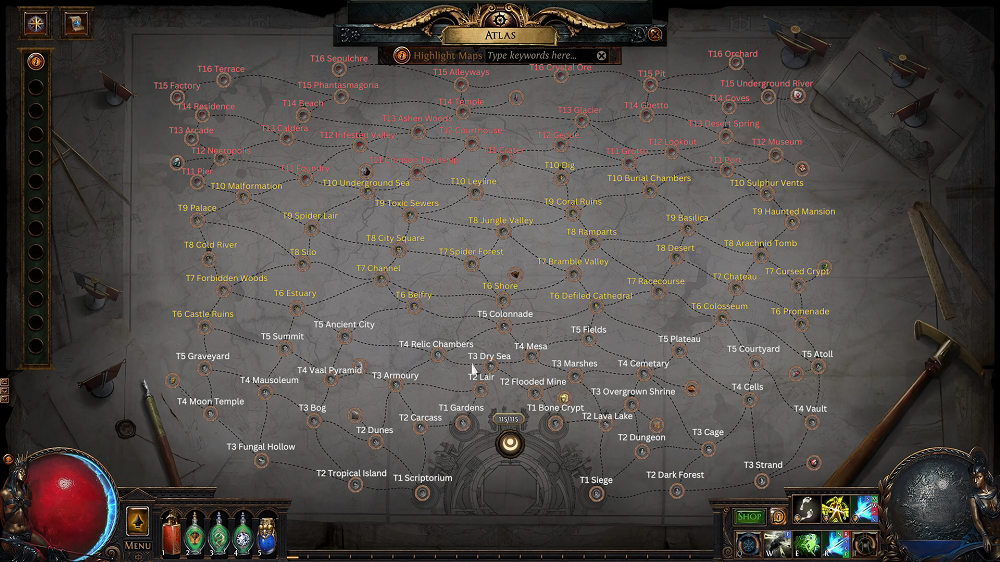
First of all, let's take a review of the key changes to maps in Path of Exile 3.25:
Tier 1: Scriptorium, Gardens, Bone Crypt, Siege
Tier 2: Tropical Island, Dunes, Carcass, Lair, Flooded Mine, Lava Lake, Dungeon, Dark Forest
Tier 3: Fungal Hollow, Bog, Armoury, Dry Sea, Marshes, Overgrown Shrine, Cage, Strand
Tier 4: Moon Temple, Mausoleum, Vaal Pyramid, Relic Chambers, Mesa, Cemetery, Cells, Vault
Tier 5: Graveyard, Summit, Ancient City, Colonnade, Fields, Plateau, Courtyard, Atoll
Tier 6: Castle Ruins, Estuary, Belfry, Shore, Defiled Cathedral, Colosseum, Promenade
Tier 7: Forbidden Woods, Channel, Spider Forest, Bramble Valley, Racecourse, Chateau, Cursed Crypt
Tier 8: Cold River, Silo, City Square, Jungle Valley, Ramparts, Desert, Arachnid Tomb
Tier 9: Palace, Spider Lair, Toxic Sewers, Corap Ruins, Basilica, Haunted Mansion
Tier 10: Malformation, Underground Sea, Leyline, Dig, Burial Chambers, Sulphur Vents
Tier 11: Pier, Foundry, Crimson Township, Crater, Grotto, Port
Tier 12: Necropolis, Infested Valley, Courthouse, Geode, Lookout, Museum
Tier 13: Arcade, Caldera, Ashen Woods, Glacier, Desert Spring
Tier 14: Residence, Beach, Temple, Ghetto, Coves
Tier 15: Factory, Phantasmagoria, Alleyways, Pit, Underground River
Tier 16: Terrace, Sepulchre, Crystal Ore, Orchard
Now it's time to look at which maps will make it easier for you to maximize your income:
Tropical Island is renowned for its simplicity and efficiency. The map's linear design makes it easy to navigate, allowing players to quickly clear mobs and gather loot. Its high mob density and straightforward layout make it ideal for fast-paced farming, perfect for early league currency generation.
Burial Chambers is highly sought after due to its potential to drop the Doctor divination card, which can be exchanged for a Headhunter. The map consists of several large rooms filled with dense packs of enemies, making it a popular choice for those looking to maximize their farming efficiency and currency returns.
Strand is a favorite for its linear layout and ease of navigation. The map's wide open spaces and predictable mob placement make it perfect for quick, efficient clears. This makes it an excellent choice for farming currency early in the league.
Glacier offers a semi-linear path with a mix of open areas and tight corridors. Known for its high mob density, this map is great for builds that excel in close-quarter combat. Its straightforward design ensures a smooth farming experience, aiding in quick currency accumulation.
Atoll's circular layout with a central island makes it easy to clear and navigate. The map's high mob density and predictable layout provide a consistent farming experience, making it a reliable choice for early league currency farming.
Mesa features a central plateau surrounded by open areas, providing ample space for maneuvering and clearing mobs. The straightforward design and easy-to-defeat boss make it a popular map for efficient farming, helping players quickly gather currency.
Underground Sea is characterized by its winding tunnels and high mob density. The map's linear progression through interconnected caverns makes it easy to navigate and clear, offering a steady flow of loot and experience, making it ideal for farming.
Tower's multi-level design requires players to progress upwards through various floors. Known for its potential to drop the Nurse divination card, which can be traded for a Doctor card, Tower is a lucrative choice for those farming for valuable divination cards early in the league.
Promenade's linear design with open courtyards connected by narrow passages makes it easy to navigate. The predictable mob placement and straightforward layout make it a great choice for efficient farming, allowing players to quickly clear the map and gather currency.
Haunted Mansion consists of a series of interconnected rooms within a mansion. Its compact layout and high mob density make it an efficient map for farming, particularly for builds that thrive in confined spaces.
Arcade's labyrinth-like design with interconnected rooms and corridors offers a predictable layout and good mob density. This map is favored for its ease of navigation and efficient clearing, making it a solid choice for general farming.
Cemetery features a series of graveyards and open areas. Its straightforward layout and high mob density make it an easy map to clear and navigate, providing a steady flow of loot and experience, ideal for early league farming.
Fields is an open map with connected fields and small structures. The open layout and high mob density make it easy to see and engage enemies, providing an efficient farming experience and a steady flow of currency.
Arid Lake features a central lake with surrounding paths and open areas. The map's simplicity and high mob density make it easy to navigate and clear, making it a popular choice for efficient early league farming.
Dunes is an open map with rolling hills and scattered enemies. The map's layout allows for easy navigation and quick clears, providing a steady flow of loot and experience, making it a reliable choice for currency farming.
Here we list which Divination cards you can farm on each map to help you find out the best map to farm Div Cards in Path of Exile 3.25 Settlers of Kalguur league:
Relic Chambers Map: Blind Venture · The Opulent (tier 13+) · The Lord of Celebration (tier 9+) · Temperance (tier 13+)
Strand Map: Boundless Realms · Lysah’s Respite · The Catch (tier 13+) · I See Brothers
The Coward’s Trial: Coveted Possession · The Celestial Justicar · Grave Knowledge · The Forsaken
Ziggurat Map: Coveted Possession · The Celestial Justicar · Grave Knowledge · The Void (tier 13+) · Lucky Deck · The Forsaken · Might is Right · No Traces · The Jeweller’s Boon · The Samurai’s Eye (tier 13+) · A Sea of Blue · The Rabbit’s Foot
Sanctuary Map: Coveted Possession · The Enlightened · Blind Venture · Prosperity (tier 13+) · The Void (tier 13+) · The Opulent (tier 13+) · The Innocent · The Lord of Celebration (tier 9+) · Demigod’s Wager · Succor of the Sinless (tier 13+) · Costly Curio (tier 13+)
Oba’s Cursed Trove: Coveted Possession · The Lich · Might is Right · No Traces
Academy Map: Destined to Crumble (tier 13+) · The Professor · A Dab of Ink · Thirst for Knowledge
Haunted Mansion Map: Dialla’s Subjugation · The Life Thief · The Emptiness (tier 13+) · The Transformation
Sulphur Vents Map: Doedre’s Madness · The Inoculated (tier 5+) · The Darkest Dream (tier 1+) · Vile Power
The Putrid Cloister: Doedre’s Madness · The Soul · The Witch · Brush, Paint and Palette
Courtyard Map: Emperor’s Luck · Rain Tempter · Azyran’s Reward (tier 12+) · Peaceful Moments
Gardens Map: Emperor’s Luck · The Flora’s Gift · Rain Tempter · The Fox in the Brambles
Cold River Map: Forbidden Power · The Army of Blood · The Mountain · The Whiteout
Promenade Map: Gemcutter’s Promise · Merciless Armament (tier 13+) · The Warlord (tier 13+) · The Patient
Bog Map: Glimmer of Hope · The Rabid Rhoa (tier 13+) · The Deceiver · The Darkest Dream (tier 1+)
Cursed Crypt Map: Grave Knowledge · The Wretched · Might is Right · No Traces
Shore Map: Hope · The Road to Power (tier 13+) · The Formless Sea · Astral Protection
Channel Map: Hunter’s Resolve · The Scavenger · Desperate Crusade · The Destination (tier 13+)
Desert Map: Imperial Legacy (tier 13+) · The Tumbleweed (tier 13+) · Gift of Asenath (tier 7+) · A Note in the Wind
Dunes Map: Imperial Legacy (tier 13+) · The Tumbleweed (tier 13+) · Gift of Asenath (tier 7+) · Acclimatisation
Colonnade Map: Jack in the Box · Dying Anguish · The Coming Storm · The Enforcer (tier 13+)
Whakawairua Tuahu: Lantador’s Lost Love · The Avenger · The Vast · The Doppelganger
Estuary Map: Lantador’s Lost Love · The Messenger · From Bone to Ashes · Lonely Warrior (tier 7+)
Tropical Island Map: Loyalty · Pride of the First Ones (tier 12+) · The Adventuring Spirit · The Scout
Caer Blaidd, Wolfpack’s Den: Loyalty · The Dragon · The Wolf’s Shadow · The Wolf
Crater Map: Pride Before the Fall · The Lion · Heterochromia · The Standoff
Olmec’s Sanctum: Rain of Chaos · The Encroaching Darkness · The Harvester · The Awakened (tier 13+)
Castle Ruins Map: Rain of Chaos · The Mercenary · The Tyrant (tier 13+) · Lingering Remnants (tier 10+)
Spider Lair Map: Shard of Fate · The Web · The Craving · Poisoned Faith
Scriptorium Map: The Aesthete · Immortal Resolve · The Academic · Checkmate
Beach Map: The Avenger · The Encroaching Darkness · The Journey · The Leviathan (tier 13+)
Lava Lake Map: The Battle Born · The King’s Heart · Burning Blood (tier 13+) · A Modest Request
Caldera Map: The Battle Born · The Lion · The Mad King (tier 13+) · From Bone to Ashes
Leyline Map: The Brittle Emperor (tier 2+) · The Fletcher · Bowyer’s Dream (tier 13+) · The Wolf
Maze Map : The Catalyst · Blind Venture · The Admirer (tier 7+) · The Damned
Citadel Map: The Celestial Justicar · Wealth and Power (tier 7+) · Grave Knowledge · The Void (tier 13+) · The Forsaken · The Jeweller’s Boon · A Sea of Blue · The Rabbit’s Foot · The Shieldbearer (tier 2+)
Dungeon Map: The Chains that Bind · The Penitent · Boon of Justice (tier 5+) · The Last Supper
Cage Map: The Chains that Bind · The Penitent · The Awakened (tier 13+) · The Dungeon Master (tier 13+)
Residence Map: The Conduit (tier 1+) · The Dapper Prodigy (tier 13+) · Light and Truth · Fire Of Unknown Origin (tier 13+)
Death and Taxes: The Dark Mage · Shard of Fate · Emperor of Purity · The Garish Power
Defiled Cathedral Map: The Dark Mage · The Blazing Fire · Demigod’s Wager · The Apothecary (tier 7+)
Dark Forest Map: The Demoness (tier 4+) · The Wolf’s Shadow · Mawr Blaidd (tier 14+) · Etched in Blood (tier 9+)
Spider Forest Map: The Doctor (tier 7+) · The Betrayal (tier 7+) · The Witch · Poisoned Faith
Sepulchre Map: The Doctor (tier 7+) · The Incantation · The Cacophony · Brush, Paint and Palette
Fungal Hollow Map: The Dragon · Pride of the First Ones (tier 12+) · Desperate Crusade · The Shepherd’s Sandals (tier 13+)
Fortress Map: The Dragon’s Heart (tier 7+) · The Void (tier 13+) · The Standoff · Burning Blood (tier 13+) · The Cheater (tier 13+) · The Tireless Extractor · Who Asked (tier 13+)
Pier Map: The Drunken Aristocrat · The Pact · The Harvester · The Fishmonger
Ramparts Map: The Drunken Aristocrat · The Warlord (tier 13+) · The Traitor · The Ruthless Ceinture
Pillars of Arun: The Encroaching Darkness · The Tower · Earth Drinker · A Note in the Wind
Crystal Ore Map: The Endurance · The Jeweller’s Boon · Friendship (tier 13+) · A Sea of Blue
Acton’s Nightmare: The Enlightened · The Skeleton · Cursed Words · I See Brothers
Bramble Valley Map: The Explorer · The Bitter Blossom (tier 4+) · The Adventuring Spirit · Alivia’s Grace
Infested Valley Map: The Feast · The Bitter Blossom (tier 4+) · The Offspring · The Mind’s Eyes (tier 7+)
Lair of the Hydra Map: The Feast · The Throne · Father’s Love (tier 13+)
Toxic Sewer Map: The Feast · The Throne · The Web · Toxic Tidings
Foundry Map: The Fiend (tier 7+) · Gift of the Gemling Queen (tier 2+) · The Tireless Extractor · Further Invention (tier 13+)
Poorjoy’s Asylum: The Fiend (tier 7+) · The Thaumaturgist · The Army of Blood · The Golden Era (tier 13+)
Mao Kun The Formless Sea · The Landing (tier 10+) · The Deep Ones · The Cache
Doryani’s Machinarium: The Forward Gaze · Doryani’s Epiphany (tier 4+)
Vault Map: The Gambler · Abandoned Wealth · The Opulent (tier 13+) · The Cache
Arcade Map: The Gentleman · The Tyrant (tier 13+) · The Enthusiasts · Deadly Joy (tier 13+)
Racecourse Map: The Gladiator · The King’s Blade · The Arena Champion (tier 5+) · Three Voices
Pit Map: The Gladiator · The Last One Standing (tier 12+) · The Deceiver · Unchained
Pit of the Chimera Map: The Gladiator · The Last One Standing (tier 12+) · The King’s Blade · The Arena Champion (tier 5+) · The Visionary (tier 3+) · The Deceiver · The Sword King’s Salute · Boon of the First Ones · A Familiar Call (tier 13+) · Unchained · Father’s Love (tier 13+)
Dry Sea Map: The Golden Era (tier 13+) · Baited Expectations · Astral Protection · The Fortunate
Vaults of Atziri: The Hoarder · Chaotic Disposition · The Queen (tier 12+) · The Spoiled Prince (tier 13+)
Basilica Map: The Hoarder · Prosperity (tier 13+) · The Saint’s Treasure · The Bear Woman (tier 13+)
Abomination Map: The Hunger · The Artist (tier 7+) · Death · The Inoculated (tier 5+) · The Aesthete · The Offering · The Soul · The Void (tier 13+) · The Insatiable · Immortal Resolve · Harmony of Souls · The Nurse (tier 7+) · Vile Power · The Prince of Darkness
Malformation Map: The Hunger · The Soul · The Prince of Darkness · Parasitic Passengers (tier 13+)
Vaal Pyramid Map: The Inventor · Her Mask · Atziri’s Arsenal · Arrogance of the Vaal
Vaal Temple Map: The Inventor · The Catalyst · Last Hope · The Sigil (tier 5+) · Her Mask · The Admirer (tier 7+) · Three Voices · Beauty Through Death (tier 12+) · The Damned · Unrequited Love
Desert Spring Map: The Last One Standing (tier 12+) · Earth Drinker · Baited Expectations · Acclimatisation
Cemetery Map: The Lich · More is Never Enough · Ambitious Obsession · Man With Bear
Coves Map: The Lover · Scholar of the Seas · The Rite of Elements (tier 4+) · The Landing (tier 10+)
Maelström of Chaos: The Lover · The Siren · Lysah’s Respite · The Transformation
Moon Temple Map: The Lunaris Priestess · The Innocent · Seven Years Bad Luck · The Progeny of Lunaris (tier 13+)
Ashen Wood Map: The Mercenary · The Fletcher · Bowyer’s Dream (tier 13+) · Burning Blood (tier 13+)
Mausoleum Map: The Offering · The Forsaken · The Skeleton · Costly Curio (tier 13+)
Summit Map: The Pack Leader · Mitts · The Mountain · A Chilling Wind (tier 4+)
City Square Map: The Poet · Assassin’s Favour · Three Voices · Home
Silo Map: The Polymath · Haunting Shadows · Further Invention (tier 13+) · Who Asked (tier 13+)
Terrace Map: The Porcupine · The Easy Stroll (tier 10+) · Peaceful Moments · The Fox in the Brambles
Orchard Map: The Porcupine · The Wilted Rose (tier 4+) · Boon of Justice (tier 5+) · Brotherhood in Exile
Grotto Map: The Primordial (tier 12+) · The Tinkerer’s Table · A Sea of Blue · Terrible Secret of Space (tier 4+)
Ancient City Map: The Queen (tier 12+) · Humility · The Spoiled Prince (tier 13+) · Unrequited Love
Lair Map: The Road to Power (tier 13+) · The Cursed King · The Wolven King’s Bite (tier 9+) · The Shepherd’s Sandals (tier 13+)
The Vinktar Square: The Rusted Bard
Fields Map: The Scarred Meadow · Chaotic Disposition · The Fox · Tranquillity
Mesa Map: The Scarred Meadow · The Fox · Tranquillity · The Fortunate
Chateau Map: The Scavenger · The Bear Woman (tier 13+) · Brotherhood in Exile · Home
Courthouse Map: The Scholar · The Oath · The Undaunted · Thirst for Knowledge
Museum Map: The Scholar · The Rabid Rhoa (tier 13+) · Destined to Crumble (tier 13+) · Checkmate
Palace Map: The Sephirot · The Lord of Celebration (tier 9+) · The Unexpected Prize · The Forgotten Treasure (tier 13+)
Forbidden Woods Map: The Sigil (tier 5+) · Mawr Blaidd (tier 14+) · Call to the First Ones · The Scout
Underground Sea Map: The Siren · The Doppelganger · The Fathomless Depths · Divine Beauty
Forge of the Phoenix Map: The Standoff · Burning Blood (tier 13+) · The Tireless Extractor · Father’s Love (tier 13+) · Who Asked (tier 13+)
Bone Crypt Map: The Summoner · The Celestial Justicar · The Craving · Rebirth and Renewal (tier 13+)
Temple Map: The Sun · The Twins (tier 13+) · Prosperity (tier 13+) · The Twilight Moon
The Twilight Temple: The Sun · The Twins (tier 13+) · The Lunaris Priestess · Forbidden Power
Arachnid Tomb Map: The Surgeon (tier 7+) · Echoes of Love · Draped in Dreams (tier 13+) · The Wedding Gift
Overgrown Shrine Map: The Surgeon (tier 7+) · Emperor of Purity · Echoes of Love · Draped in Dreams (tier 13+)
Lighthouse Map: The Surveyor (tier 7+) · The Oath · The Fishmonger · Azure Rage (tier 13+)
Marshes Map: The Survivalist · Death · The Eye of the Dragon · The Fathomless Depths
Flooded Mine Map: The Survivalist · Glimmer of Hope · The Rite of Elements (tier 4+) · A Stone Perfected (tier 12+)
Burial Chambers Map: The Thaumaturgist · Cursed Words · The Brawny Battle Mage (tier 13+) · Brother’s Gift
Lookout Map: The Traitor · Struck by Lightning (tier 7+) · The Blazing Fire · The Journalist
Alleyways Map: The Trial (tier 10+) · Assassin’s Favour · The Life Thief · The Long Watch
Siege Map: The Trial (tier 10+) · The Side Quest · Broken Promises (tier 13+) · Home
Graveyard Map: The Union · The Coming Storm · Struck by Lightning (tier 7+) · Brother’s Stash
Necropolis Map: The Union · The One With All · The Garish Power · The Rabbit’s Foot
Cells Map: The Warden · Immortal Resolve · Harmony of Souls · The Last Supper
Hallowed Ground: The Warden · The Emptiness (tier 13+) · The Dungeon Master (tier 13+) · The Enforcer (tier 13+)
Colosseum Map: The Watcher (tier 1+) · The Visionary (tier 3+) · The Sword King’s Salute · The Mad King (tier 13+)
Jungle Valley Map: The Wind (tier 2+) · The One With All · Alivia’s Grace · The Wedding Gift
Atoll Map: The Wind (tier 2+) · The Vast · The Spark and the Flame · The Destination (tier 13+)
Glacier Map: The Wolverine · Mitts · The Whiteout · A Chilling Wind (tier 4+)
Crimson Township Map: The Wrath · Demigod’s Wager · The Demon (tier 7+) · The Journalist
Belfry Map: The Wrath · The Tower · The Enlightened · The Innocent
Port Map: Three Faces in the Dark · Lucky Connections · The Return of the Rat · Matryoshka (tier 13+)
Armoury Map: Three Faces in the Dark · Merciless Armament (tier 13+) · Rats · The Side Quest
Coral Ruins Map: Thunderous Skies · The Old Man · Deadly Joy (tier 13+) · The One That Got Away
Plateau Map: Thunderous Skies · The Stormcaller · The Spark and the Flame · The Deep Ones
Geode Map: Time-Lost Relic · Buried Treasure · Lachrymal Necrosis · Bijoux (tier 13+)
Maze of the Minotaur Map: Treasure Hunter · The Tinkerer’s Table · Father’s Love (tier 13+)
Underground River Map: Treasure Hunter · The Wolverine · Left to Fate (tier 10+) · Man With Bear
Carcass Map: Vinia’s Token · The Insatiable · The Nurse (tier 7+) · Parasitic Passengers (tier 13+)
Dig Map: Volatile Power · The Endurance · Ambitious Obsession · Bijoux (tier 13+)
 Google Safe

 0
0

 Home
Home


 Follow us on Discord